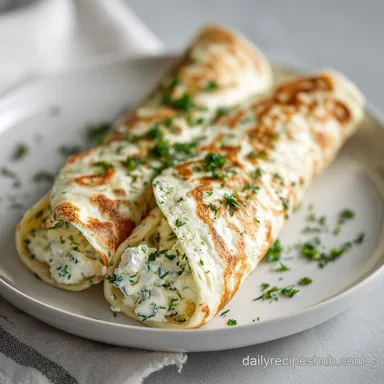
Cottage Cheese Wrap with Herbs: High-Protein & Healthy

- Time:5 minutes prep + 20 minutes cook = 25 minutes total
- Flavor/Texture Hook: Velvety batter that bakes into a supple, savory wrap
- Perfect for: High protein meal prep or a quick keto friendly lunch
- Why High Protein Ratios Create Success
- Ingredient Science Behind Simple Components
- Essential Equipment for A Success
- Precision Instructions for Baking Wraps
- Fixing Common Problems and Texture Issues
- Flavor Variations for Different Meal Prep
- Smart Storage and Sustainable Leftover Ideas
- Serving Ideas for Better Protein Intake
- Scaling for Larger Groups
- Kitchen Truths and Debunked Myths
- Recipe FAQs
- 📝 Recipe Card
Discover our standout recipe for an Easy Healthy 2 Ingredient Cottage Cheese Wrap with Herbs. I remember the first time I tried making a low carb wrap without flour; it was a total disaster that ended with me scraping a rubbery, wet mess off my baking sheet while wondering where I went wrong.
Most people struggle because they don't handle the moisture correctly, resulting in a wrap that feels more like a sad omelet than a functional tortilla.
The secret isn't just the ingredients, but how you treat them before they even hit the oven. We're looking for a specific transformation where the curds disappear entirely, creating a smooth emulsion that bakes evenly.
If you’ve ever bitten into a wrap and found a random chunk of cold cottage cheese, you know exactly why the blending stage is non negotiable.
By the time you finish this bake, the aroma of toasted garlic and herbs will fill your kitchen, and you'll have a wrap that can actually hold a mountain of turkey and avocado without giving way.
It’s sturdy, it’s savory, and honestly, it’s one of those kitchen wins that makes you feel like you’ve cheated the system. Let’s get into the specifics of why this works and how you can nail it every single time.
Why High Protein Ratios Create Success
When we combine cottage cheese and eggs, we aren't just mixing food; we are creating a structural network. Understanding the chemistry helps you realize why we can't just stir this with a fork and hope for the best.
- Protein Denaturation: As the eggs and cheese heat up, their protein strands uncoil and rebond, creating a tight "mesh" that mimics the structure of gluten.
- Evaporation Control: The 20 minutes of baking time allows excess water to escape, preventing that dreaded "wet" texture while keeping the center supple.
- Maillard Reaction: The small amount of natural sugars in the dairy browns against the heat, providing that mahogany edge and a deeper flavor profile.
- Emulsification: Blending the fats in the yolk with the proteins in the cheese creates a velvety batter that spreads into a uniform sheet rather than separate pools of liquid.
| Method | Time | Texture | Best For |
|---|---|---|---|
| Baking (Oven) | 20 minutes | Supple, sturdy, evenly browned | Meal prep and large wraps |
| Pan Frying | 10 minutes | Crispy edges, softer middle | Quick single servings |
| Air Fryer | 12 minutes | Shatter crisp edges, very dry | Chips or crackers |
Choosing the oven method is generally the safest bet for beginners because it provides the most consistent heat distribution. While a pan is faster, it’s much harder to flip a wrap this large without it folding over on itself.
The oven allows the entire surface to set simultaneously, which is the key to that "bread like" flexibility we all want.
Ingredient Science Behind Simple Components
Every item in this 4 ingredient list (counting the seasonings) plays a specific role in the final bite. We aren't just adding flavor; we are adjusting the physics of the batter.
| Ingredient | Science Role | Pro Secret |
|---|---|---|
| Cottage Cheese | Structural base and moisture | Use full fat for a more flexible, less brittle wrap. |
| Large Eggs | Binding agent and leavening | Room temperature eggs emulsify faster than cold ones. |
| Dried Herbs | Flavor and fiber | Crushing herbs between your palms releases essential oils. |
| Garlic Powder | Flavor profile | Helps mask the "eggy" scent some people find off putting. |
Since this recipe relies so heavily on dairy, the quality of your cheese matters. I’ve found that high protein, small curd varieties blend the smoothest. If you’re looking to pair this with a refreshing side, it goes remarkably well with a Zucchini Pasta Salad which keeps the whole meal light and vibrant.
Essential Equipment for A Success
You don't need a professional kitchen, but two items are absolutely critical for this recipe to work: a high speed blender and high-quality parchment paper. Without the blender, the curds won't break down, and you'll end up with a lumpy texture.
Without the parchment, you'll be scraping your lunch off the pan with a putty knife.
- High Speed Blender: Such as a NutriBullet or Vitamix, to ensure a completely smooth, liquid consistency.
- 13x18 Inch Baking Sheet: This provides the surface area needed for the batter to spread thin.
- Silicone Spatula: Perfect for scraping every drop of batter out of the blender.
- Parchment Paper: Ensure it is specifically "non stick" and not wax paper.
Chef's Tip: If your parchment paper keeps curling up on the edges of the pan, crumple it into a tight ball first, then flatten it out. It will lay perfectly flat without fighting you.
Precision Instructions for Baking Wraps
Follow these steps exactly to avoid the common pitfalls of soggy or brittle wraps. The timing is calibrated for a standard oven set to 180°C (350°F).
- Prep the base. Place 1 cup (225g) cottage cheese and 2 large eggs into your blender. Note: Using a scale for the cheese ensures the moisture ratio is exact.
- Add seasonings. Toss in 1 tsp dried Italian herbs and 1/4 tsp garlic powder.
- Liquify the mixture. Pulse on high for 30 45 seconds until the mixture is completely liquid with no visible curds.
- Prepare the pan. Line your 13x18 inch baking sheet with parchment paper. Do not grease the paper; the wrap needs to "grip" slightly to stay thin.
- Pour and spread. Pour the batter into the center and use a spatula to spread it into a thin, even rectangle.
- Bake the wrap. Place in the center rack for 20 minutes until the edges are golden and mahogany.
- Check for doneness. The center should feel firm and not tacky when lightly pressed with a finger.
- Cooling period. Let the wrap sit on the pan for 5 minutes before attempting to peel it off. This allows the steam to dissipate.
- The peel. Gently lift one corner of the parchment and slowly peel the wrap away. It should come off in one piece.
Fixing Common Problems and Texture Issues

If your wrap isn't behaving, it's usually a heat or moisture issue. Don't panic; most of these are easy fixes for your next batch.
Why Your Wrap Stuck to the Paper
This is the most frequent complaint, and it usually stems from using low quality parchment or underbaking. If the wrap is still moist, the proteins haven't fully set, making them act like glue against the paper fibers.
Why Your Wrap Is Too Rubbery
This happens when the batter is too thick or if you used egg whites only. The fat in the yolk is what provides the "shortness" or tenderness to the "crumb" of the wrap. If it feels like a bouncy ball, try spreading the batter even thinner next time.
| Problem | Root Cause | Solution |
|---|---|---|
| Soggy middle | Underbaked or uneven spread | Bake for 3-5 more mins; use a spatula for a level surface. |
| Brittle edges | Oven is too hot | Reduce temp by 10 degrees and check at 15 minutes. |
| Tears easily | Batter wasn't blended enough | Ensure 45 seconds of high speed blending for full emulsion. |
Common Mistakes Checklist:
- ✓ Never use wax paper; it will melt into your wrap and ruin the dish.
- ✓ Avoid "fat free" cottage cheese as it contains more stabilizers that can make the wrap gummy.
- ✓ Don't skip the cooling time; that 5 minute rest is when the structure fully solidifies.
- ✓ Ensure your oven is fully preheated before the pan goes in to prevent "steaming" the eggs.
Flavor Variations for Different Meal Prep
Once you've mastered the base, you can start playing with the profile to match your mood. The "herbs" part of this recipe is a playground for your spice cabinet.
- Taco Style: Replace Italian herbs with cumin, chili powder, and a pinch of smoked paprika.
- Everything Bagel: Skip the dried herbs and sprinkle "Everything Bagel" seasoning over the batter right before it goes into the oven.
- Spicy Kick: Add a teaspoon of Sriracha or a pinch of cayenne pepper directly into the blender.
- Cheesy Crust: Sprinkle a tablespoon of finely grated Parmesan over the top 5 minutes before the timer goes off for a crispy, salty finish.
If you are looking for a filling that packs a punch, I highly recommend stuffing these with a Jalapeno Popper Chicken Salad. The creaminess of the salad against the herbaceous wrap is a match made in heaven.
Smart Storage and Sustainable Leftover Ideas
These wraps are fantastic for meal prep because they don't get soggy as quickly as flour tortillas. You can make a double batch and have lunch ready for the whole week.
- Fridge
- Keep them in an airtight container for up to 4 days. Place a piece of parchment paper between wraps to prevent them from sticking together.
- Freezer
- These actually freeze quite well! Wrap them individually in plastic wrap and store in a freezer bag for up to 2 months.
- Reheating
- Avoid the microwave if possible, as it can make them rubbery. A quick 30 seconds in a dry pan over medium heat will bring back the flexibility.
Zero Waste Tip: If you have edges that got a little too crispy or broken pieces, don't throw them away. Slice them into thin strips and use them as high protein "croutons" for a Caesar salad or toss them into a soup right before serving for a noodle like texture.
Serving Ideas for Better Protein Intake
The beauty of this wrap is its versatility. It can hold heavy, wet ingredients much better than a standard gluten-free tortilla.
- The Bistro Wrap: Layer with smoked turkey, thin slices of provolone, sprouts, and a heavy schmear of Dijon mustard.
- Mediterranean Style: Fill with hummus, roasted red peppers, cucumbers, and feta cheese.
- Breakfast Burrito: Scramble two more eggs with spinach and roll them inside the herb wrap for a double protein hit to start the day.
Chef's Tip: If you're making a wrap to eat later, put the "wet" ingredients (like tomatoes or pickles) in the very center, shielded by greens or meat. This keeps the wrap from absorbing moisture while it sits in your lunchbox.
Scaling for Larger Groups
Need to feed a crowd? This recipe scales linearly, but you have to watch your pan space.
- Double Batch (4 wraps): You will need two baking sheets. Do not try to crowd two wraps onto one sheet, or they will merge into one giant, thick rectangle that won't cook through.
- Spices: When doubling, keep the garlic powder at 1.5x rather than a full double to avoid it becoming overpowering.
- Baking Time: If baking two pans at once, rotate them halfway through the 20 minutes (top to bottom and front to back) to ensure even browning.
Kitchen Truths and Debunked Myths
There's a lot of misinformation about cottage cheese recipes online. Let's clear the air.
Myth: You must use expensive organic cottage cheese for this to work. Truth: While quality varies, any standard full fat cottage cheese will work. The "expensive" stuff often has fewer gums, which is nice, but not required for structural success.
Myth: You can substitute the eggs for "flax eggs" or other vegan binders. Truth: In this specific 2 ingredient recipe, the egg proteins are the only thing providing structure. Replacing them will result in a puddle of warm cheese that never sets.
Myth: The wrap will taste like a giant omelet. Truth: Surprisingly, the cottage cheese neutralizes the "eggy" flavor. When combined with the herbs and garlic, it tastes much more like a savory flatbread than breakfast.

Recipe FAQs
How to ensure the wrap doesn't tear when rolling?
Bake until the edges turn a deep, mahogany gold. This extra color signifies the moisture has evaporated sufficiently, creating a sturdy, flexible structure that won't crack under the weight of fillings.
Is it true I can use wax paper instead of parchment?
No, this is a common misconception. Wax paper is not heat stable at oven temperatures and will melt into your food; you must use high-quality parchment paper to prevent sticking.
How to fix a wrap that still has visible cottage cheese curds?
Pulse the mixture in your blender for a longer duration. You must continue blending until the batter is a perfectly smooth, uniform liquid to ensure the final texture is supple rather than grainy.
How to store leftovers for meal prep?
Layer your cooled wraps between sheets of parchment paper inside an airtight container. They will stay fresh and ready to use in your refrigerator for up to four days.
How to achieve an even thickness across the baking sheet?
Tilt the pan slowly in circular motions immediately after pouring the batter. If any gaps remain, use a flat spatula to gently nudge the liquid into the corners for a consistent bake.
Can I bake these at a higher temperature to speed up the process?
No, stick to the recommended temperature for the best results. High heat causes the eggs to puff and bubble unevenly; if you enjoyed mastering the delicate cheese textures here, you know that steady heat is essential for a uniform, flat wrap.
How to tell when the wrap is fully cooked?
Look for a set center and golden brown edges. If the middle still looks wet or glossy, give it another minute in the oven to ensure it is completely dry to the touch.
Easy Cottage Cheese Herb Wraps
Ingredients:
Instructions:
Nutrition Facts:
| Calories | 164 calories |
|---|---|
| Protein | 18.7 g |
| Fat | 7.4 g |
| Carbs | 4.6 g |
| Fiber | 0.3 g |
| Sugar | 4.1 g |
| Sodium | 428 mg |
