Peanut Butter Pie with Chocolate Topping: Creamy
- Time:15 minutes active + 4 hours 10 mins chilling = Total 4 hours 25 mins
- Flavor/Texture Hook: Velvety peanut butter filling with a shatter crisp Oreo base
- Perfect for: High impact dessert tables, potlucks, or a weekend treat for peanut butter lovers
- The Secret to this Unbelievable Peanut Butter Pie Recipe with Chocolate Topping
- The Logic Behind the Texture
- Component Analysis for the Perfect Slice
- The Pantry Essentials for Your PB Dream
- Essential Kitchen Gear
- Step by Step to a Silky Finish
- Fixing Common PB Pie Hiccups
- Switching it Up for Different Cravings
- Keeping Your Slices Fresh and Zero Waste
- What to Serve With Your Sweet Treat
- Recipe FAQs
- 📝 Recipe Card
The Secret to this Unbelievable Peanut Butter Pie Recipe with Chocolate Topping
The smell of chocolate melting in a saucepan is probably my favorite scent in the world. There is something about that rich, deep aroma that just signals "dessert time" to everyone in the house.
For years, I believed the myth that you needed a professional tempering machine or a culinary degree to get that glossy, bakery style glaze on a pie. I thought a simple home kitchen setup would always result in a dull or grainy topping.
But here is the truth: you don't need fancy gear or expensive imported cocoa. You just need a bit of patience and the right ratio of fat to chocolate. Here is the ultimate Unbelievable Peanut Butter Pie Recipe with Chocolate Topping.
It's the kind of dessert that looks like it took a whole day of effort but actually relies on a few smart shortcuts and basic pantry staples.
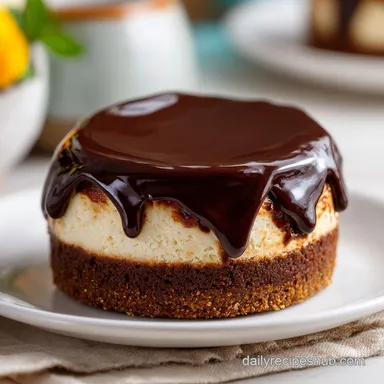
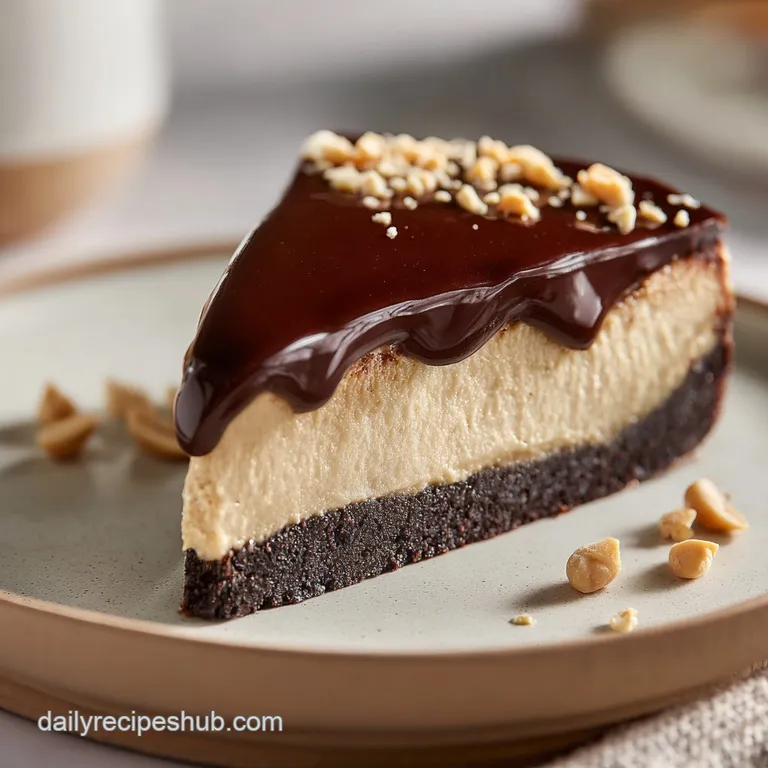
This recipe focuses on contrast. You have the salty, nutty depth of the peanut butter, the slight tang of cream cheese, and the bittersweet snap of the chocolate. When you take that first bite, you get the crunch of the Oreo crust followed by a filling that feels like a cloud.
It is decadent, yes, but the balance of flavors keeps it from being cloying.
The Logic Behind the Texture
This isn't just about mixing ingredients, it's about how they behave together. The goal is a filling that holds its shape when sliced but doesn't feel like a brick of peanut butter. By using a mix of cream cheese and whipped cream, we create a stable foam that is structurally sound but velvety.
- Protein Stability
- Cream cheese provides a thick, stable base that prevents the filling from weeping.
- Air Integration
- Whipping the heavy cream introduces tiny air bubbles, which lightens the dense peanut butter.
- Fat Emulsion
- Adding a touch of butter to the ganache creates that mahogany shine and a smoother mouthfeel.
- Sugar Dissolution
- Powdered sugar dissolves instantly, ensuring there are no gritty crystals in the filling.
| Servings | Ingredient Adjustments | Pan Size | Total Chill Time |
|---|---|---|---|
| 4 people | 1 cup Oreo crumbs, 1/2 cup PB | 6 inch springform | 4 hours |
| 8 people | Full recipe quantities | 9 inch pie plate | 4 hours 25 mins |
| 12 people | 1.5x ingredients | 10 inch deep dish | 5 hours |
Component Analysis for the Perfect Slice
Every layer in this pie has a specific job. If you skip the salt in the crust, the whole thing tastes flat. If the cream cheese isn't fully softened, you'll end up with tiny white lumps in your filling that are impossible to whip out.
| Ingredient | Science Role | Pro Secret |
|---|---|---|
| Cream Cheese | Structural Anchor | Must be room temp to avoid lumps |
| Heavy Cream | Volume & Aeration | Keep chilled until the second you whip it |
| Semi Sweet Chocolate | Flavor Contrast | Use high-quality chips for a smoother melt |
| Oreo Crumbs | Texture Base | Press firmly to prevent "crust collapse" |
The Pantry Essentials for Your PB Dream
I've found that using a standard creamy peanut butter works best here. I once tried using the "natural" kind that you have to stir, and while it tasted great, the oil separated during the whipping process, leaving the filling a bit greasy. Stick to the smooth, processed stuff for the best stability.
- 2 cups (200g) Oreo cookie crumbs Why this? Provides a chocolatey, salty contrast to the PB (Substitute: Graham cracker crumbs)
- 5 tbsp (70g) melted unsalted butter Why this? Binds the crumbs into a solid crust (Substitute: Coconut oil)
- 1 pinch (1g) salt Why this? Cuts through the heavy sweetness (Substitute: Flaky sea salt)
- 1 cup (255g) creamy peanut butter Why this? The primary flavor and thickening agent (Substitute: Almond butter)
- 8 oz (225g) softened cream cheese Why this? Adds tang and holds the shape (Substitute: Mascarpone)
- 1 cup (120g) powdered sugar Why this? Sweetens without adding grit (Substitute: Finely blended granulated sugar)
- 1.5 cups (360ml) heavy whipping cream, chilled Why this? Creates the airy, mousse like texture (Substitute: Coconut cream)
- 1 tsp (5ml) vanilla extract Why this? Rounds out the nutty notes (Substitute: Almond extract)
- 0.5 cup (120ml) heavy cream Why this? Base for the ganache (Substitute: Whole milk + 1tbsp butter)
- 4 oz (115g) semi sweet chocolate chips Why this? Provides the bittersweet finish (Substitute: Chopped dark chocolate)
- 1 tbsp (15g) unsalted butter Why this? Gives the glaze a professional shine (Substitute: Extra heavy cream)
Essential Kitchen Gear

You don't need a professional kitchen, but a few specific tools make this much easier. If you don't have a hand mixer, you can whip the cream by hand, but your arm will definitely feel it.
A rubber spatula is non negotiable for the folding process, as a whisk would deflate all those precious air bubbles we worked so hard to create.
- 9 inch pie plate or springform pan
- Electric hand mixer or stand mixer
- Large chilled mixing bowl (metal is best)
- Rubber spatula
- Small saucepan
- Fine mesh strainer (optional, for the ganache)
Step by step to a Silky Finish
Right then, let's get into the making. The key here is the order of operations. We want the crust set before the filling goes in, and the filling chilled before the ganache hits the top.
Phase 1: Constructing the Base
- Combine the Oreo crumbs, melted butter, and salt in a bowl. Mix until it looks like wet sand.
- Press the mixture firmly into the bottom and up the sides of the pie plate. Note: Use the bottom of a measuring cup to get a flat, compact baseuntil it feels solid and evenly distributed.
- Place in the freezer for 10 minutes to set.
Phase 2: Whipping the Filling
- Beat the softened cream cheese and peanut butter together in a large bowl. Note: Ensure the cheese is truly soft to avoid lumpsuntil the mixture is completely smooth.
- Gradually add powdered sugar and vanilla, beating on medium speed until incorporated.
- In a separate chilled bowl, whip the heavy cream. Note: Stop as soon as you hit stiff peaksuntil the cream holds its shape firmly.
- Gently fold the whipped cream into the peanut butter mixture using a rubber spatula. Note: Use a "cut and fold" motionuntil no white streaks remain and the texture is cloud like. Pour this over your chilled crust.
Phase 3: The Ganache Finish
- Heat the heavy cream in a saucepan over medium heat. Note: Watch it closelyuntil it just begins to simmer but does not boil.
- Pour the hot cream over the chocolate chips. Let it sit undisturbed for 5 minutes.
- Stir the chocolate mixture slowly from the center outward. Note: Avoid whisking to prevent air bubblesuntil it becomes a silky, mahogany colored glaze. Stir in the 1 tbsp of butter for extra shine. Pour over the filling and chill for at least 4 hours.
Fixing Common PB Pie Hiccups
Even the best of us hit a snag. Usually, it comes down to temperature. If your cream cheese was too cold, your filling might look curdled. If your cream was too warm, it won't peak. Don't panic, most of these have a quick fix.
Runny Filling Issues
If the filling feels too soft, it's usually because the cream was over beaten or the cream cheese wasn't firm enough. You can't "un beat" cream, but you can give the pie an extra 2 hours in the freezer to help it tighten up.
Grainy Ganache Problems
Graininess happens when the chocolate is scorched or the cream didn't reach a high enough temperature to melt the cocoa butter. If this happens, you can carefully re warm the glaze in 10 second bursts in the microwave, stirring in between.
| Problem | Root Cause | Solution |
|---|---|---|
| Crust Crumbles | Not enough butter or under pressed | Press harder next time; chill longer |
| Lumpy Filling | Cold cream cheese | Beat with a mixer for 2 more minutes |
| Dull Glaze | Missing butter or under heated | Stir in 1 tsp melted butter while warm |
Common Mistakes Checklist
- ✓ Soften cream cheese for at least 2 hours before starting
- ✓ Chill your mixing bowl and beaters for 15 minutes before whipping cream
- ✓ Fold the cream gently; do not stir aggressively or you'll lose the fluff
- ✓ Let the chocolate sit for the full 5 minutes before stirring
- ✓ Use a sharp knife dipped in hot water to get clean slices
Switching it Up for Different Cravings
If you want to change the vibe of this pie, you have a lot of room to play. For a more sophisticated flavor, you could swap the semi sweet chocolate for a dark chocolate (70% cocoa). If you're looking for something different entirely, you might enjoy the rich layers of a Coffee Cheesecake which pairs beautifully with this pie on a dessert platter.
When scaling the recipe, be careful with the sugar. If you double the recipe for a larger party, only increase the salt and vanilla by 1.5x rather than 2x, as these can become overpowering in larger volumes. For a smaller version, use a 6 inch tart pan and reduce the chill time by about 30 minutes.
| Premium Ingredient | Budget Alternative | Flavor Impact | Savings |
|---|---|---|---|
| Organic Peanut Butter | Store Brand Creamy PB | Virtually identical | Save $3-5 |
| Gourmet Chocolate Bars | Semi Sweet Chips | Slightly less complex | Save $4-6 |
| Pure Vanilla Bean | Vanilla Extract | Less "speckled" look | Save $10+ |
For those who prefer a low carb lifestyle, you can adapt the base with almond flour and a sugar-free sweetener, similar to the approach used in a Keto Dirt Cake.
Keeping Your Slices Fresh and Zero Waste
This pie keeps surprisingly well. Store it in the refrigerator in an airtight container or tightly wrapped with plastic wrap to prevent it from absorbing other fridge smells. It will stay fresh for up to 5 days. If you want to freeze it, slice it first. Wrap each slice individually in parchment paper and then foil.
It will last for about 2 months in the freezer.
To reheat a frozen slice, don't use the microwave, or you'll melt the filling. Let it thaw in the fridge overnight. For the zero waste angle, if you have leftover Oreo crumbs or melted butter, use them to make mini tarts or use the crumbs as a topping for vanilla ice cream.
What to Serve With Your Sweet Treat
Since this pie is incredibly rich, you want pairings that cut through the fat. A handful of fresh raspberries or sliced strawberries adds a bright acidity that balances the peanut butter. A dollop of unsweetened whipped cream on top of each slice also lightens the experience.
If you're serving this at a party, a cup of strong, black coffee or an espresso is the gold standard. The bitterness of the coffee complements the sweetness of the chocolate ganache. For a non caffeinated option, a cold glass of almond milk or a tart cranberry spritzer works wonders to cleanse the palate between bites.
Recipe FAQs
Can I use chunky peanut butter instead of creamy?
Yes, but the texture will be coarser. Creamy peanut butter ensures the signature silky finish, while chunky adds a distinct nutty crunch to the filling.
How long does the pie need to chill?
Chill for at least 4 hours. This allows the peanut butter filling to set completely and the chocolate glaze to firm up for clean slices.
Why is my filling grainy?
Ensure your cream cheese is fully softened. Cold cream cheese fails to emulsify properly with the peanut butter, resulting in small lumps throughout the mixture.
How to get the chocolate topping smooth?
Stir slowly from the center outward. This technique incorporates the chocolate chips into the hot cream without introducing air bubbles into the glaze.
Is it true I need to bake the Oreo crust?
No, this is a common misconception. Combining melted butter with the crumbs and freezing for 10 minutes creates a perfectly compact base without heat.
How to fold whipped cream into the peanut butter mix?
Use a rubber spatula to gently stir. Fold in a circular motion until no white streaks remain to preserve the cloud like aeration.
Can I substitute the crust for a healthier option?
No, the Oreo base is essential for this specific flavor profile. If you are looking for a more nutrient dense chocolate treat, try our avocado black bean brownies.
Peanut Butter Chocolate Pie