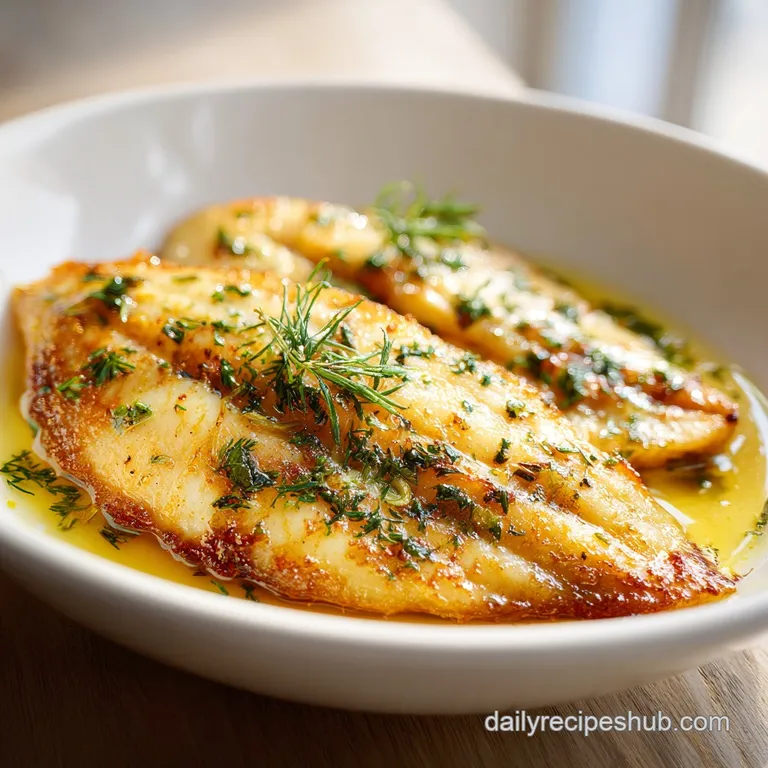
Lemon Herb Baked Flounder: Silky and Buttery
- Time:5 minutes active + 15 minutes cook = Total 20 minutes
- Flavor/Texture Hook: Velvety butter sauce with a bright, zesty pop
- Perfect for: Stress free weeknight dinners or healthy meal prep
- Nailing This Effortless Lemon Herb Baked Flounder Quick
- Quick Guide to the Bake
- The Secret Behind the Texture
- Component Analysis
- The Best Elements for Flounder
- Essential Tools for the Job
- Step by Step Cooking Flow
- Fixing Common Fish Mistakes
- Adjusting the Portion Size
- Busting Fish Myths
- Storage and Zero Waste Tips
- Ideal Pairings for This Dish
- Recipe FAQs
- 📝 Recipe Card
Nailing This Effortless Lemon Herb Baked Flounder Quick
The smell of melted butter hitting a hot oven is something that always takes me back to my grandmother's kitchen. I remember the first time I tried to cook flounder; I was terrified of it breaking apart or turning into a rubbery eraser.
I spent years overthinking it, trying fancy poaching methods, only to realize that the simplest approach is usually the one that actually tastes the best.
This Effortless Lemon Herb Baked Flounder Quick Dish is the perfect solution for a fast and flavorful dinner. It removes the anxiety of "is it done yet?" by using a over high heat, short duration bake.
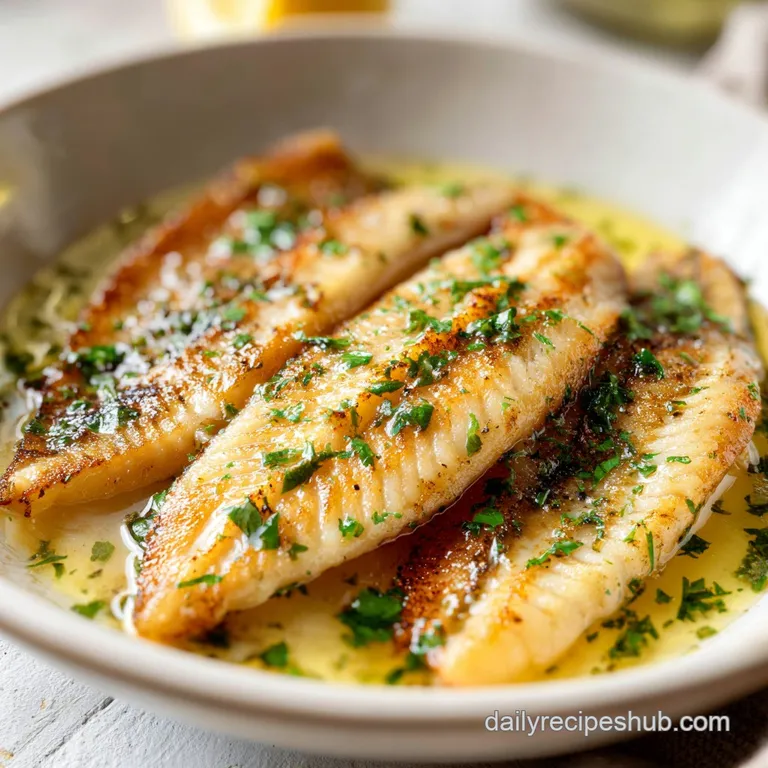
You get a fish that is pearlescent and flaky, bathed in a sauce that feels like something from a bistro but takes almost no effort to assemble.
Believe me, the secret is in the moisture control. If you've ever had "fish soup" in your baking dish, it's because the fillets weren't dry enough. Once I started patting my fish with paper towels like my life depended on it, everything changed.
Trust me on this, those few seconds of drying make the difference between a soggy mess and a velvety success.
Quick Guide to the Bake
Before we get into the weeds, you need a game plan. Fish is unforgiving, so you want your oven hot and your ingredients ready before the fillets even leave the fridge. I like to think of this as a "sprint" rather than a marathon.
When you're working with thin fillets like flounder, the window between "raw" and "rubbery" is incredibly narrow. You aren't looking for a deep brown crust, but rather a change in opacity. The moment that translucent pink turns into a clean, pearlescent white, you're golden.
To keep things moving, follow this simple timeline: 1. Preheat the oven and prep the pan (3 minutes). 2. Dry the fish and mix the sauce (5 minutes). 3. Bake and rest (15 minutes).
The Secret Behind the Texture
I've always wondered why some fish stays juicy while others dry out. It turns out it's all about the fat barrier. Since flounder is an incredibly lean white fish, it doesn't have the natural oils that salmon does to protect it from the oven's heat.
The Butter Buffer: Melted butter creates a fat based seal over the fillet, which prevents the internal moisture from evaporating too quickly.
Acidic Tenderizing: The lemon juice doesn't just add zing, it helps break down the tight protein structures slightly, ensuring the fish stays tender.
Surface Tension: By removing surface water, the olive oil and butter can adhere directly to the fish, facilitating a more even heat transfer. If you're looking for other light options to serve alongside, my almond flour crackers make a great, crunchy side.
High Heat Flash: Baking at 200°C (400°F) cooks the outside quickly enough to lock in juices before the center overcooks.
| Thickness | Internal Temp | Rest Time | Visual Cue |
|---|---|---|---|
| 0.5 inch | 63°C (145°F) | 2 mins | Opaque, flakes easily |
| 0.75 inch | 63°C (145°F) | 3 mins | Pearlescent white |
| 1 inch | 63°C (145°F) | 4 mins | Firm but tender |
Component Analysis
Not every ingredient is just for flavor. Some are there to do the heavy lifting in terms of texture and stability.
| Ingredient | Science Role | Pro Secret |
|---|---|---|
| Unsalted Butter | Heat Shield | Use melted butter to ensure even coverage |
| Lemon Juice | Protein Modifier | Add at the end to prevent "cooking" the fish prematurely |
| Olive Oil | Heat Conductor | Rub directly on fish for better seasoning adhesion |
| Fine Sea Salt | Osmotic Balance | Use fine salt so it dissolves instantly into the flesh |
The Best Elements for Flounder
When shopping, look for fillets that are consistent in thickness. If one end is thin and the other is thick, the thin part will be rubbery by the time the thick part is cooked. You can always gently pound the thicker end with a meat mallet to even it out.
- 1 lb flounder fillets Why this? Mild flavor and absorbs butter beautifully
- 1 tbsp olive oil Why this? Higher smoke point than butter alone
- ½ tsp fine sea salt Why this? Even distribution of flavor
- ¼ tsp black pepper Why this? Subtle warmth without overpowering the fish
- 3 tbsp unsalted butter, melted Why this? Provides the velvety mouthfeel
- 1 tbsp lemon juice Why this? Cuts through the richness of the butter
- 1 tsp lemon zest Why this? Concentrated citrus oils for aroma
- 2 cloves garlic, minced Why this? Pungent base that mellows in the oven
- 1 tbsp fresh parsley, finely chopped Why this? Fresh, grassy contrast to the lemon
Smart Substitution Options
Sometimes you're at the store and they're out of flounder, or you're trying to tweak the flavor profile. Here's what actually works.
| Original Ingredient | Substitute | Why It Works |
|---|---|---|
| Flounder Fillets | Sole or Tilapia | Similar lean texture. Note: Tilapia is slightly firmer |
| Unsalted Butter | Ghee (Clarified Butter) | Higher smoke point. Note: Slightly nuttier flavor |
| Fresh Parsley | Fresh Cilantro | Adds an earthy, citrusy note. Note: Changes the flavor profile to a more Latin vibe |
| Lemon Juice | Lime Juice | Similar acidity. Note: More tropical, pairs well with cilantro |
Essential Tools for the Job
You don't need a professional kitchen to make this happen. A few basic tools will ensure the process is smooth. I highly recommend using a baking dish that fits the fillets snugly without overcrowding them; if they're piled on top of each other, they'll steam instead of bake.
Parchment paper is your best friend here. Flounder is delicate, and trying to scrape it off a greasy pan is a recipe for disaster. With parchment, the fillets just slide right onto the plate. If you don't have parchment, a light grease with olive oil works, but be prepared for a bit more scrubbing.
A small whisk or even a fork is enough for the butter mixture. You aren't looking for a professional emulsion, just a well combined sauce that will drizzle evenly over the fish.
Step by step Cooking Flow
Let's get into the actual process. This is where the "effortless" part comes in. Just follow the cues and don't overthink it.
- Preheat your oven to 400°F (200°C). Line your baking dish with parchment paper or lightly grease it. Note: A hot oven is non negotiable for the right texture.
- Use paper towels to pat the flounder fillets completely dry. Arrange them in a single layer, rub with olive oil, and season evenly with salt and pepper. Note: Drying prevents the fish from steaming.
- In a small bowl, whisk together the melted butter, lemon juice, zest, and minced garlic.
- Stir in the chopped parsley. Pour the mixture evenly over each fillet, using a spoon to ensure the edges are fully coated.
- Bake in the center rack for 12–15 minutes until the flesh transforms from translucent to an opaque, pearlescent white and flakes easily with a fork.
Fixing Common Fish Mistakes
The biggest issue people have with this Baked Flounder Quick dish is timing. Because it's so thin, two extra minutes in the oven can turn a velvety fillet into a piece of cardboard.
Rubbery or Tough Fish
This usually happens because the internal temperature passed 65°C. Fish continues to cook for a few minutes after you take it out of the oven, so pull it out the second it looks opaque.
Soggy or Watery Fillets
If there's a pool of liquid in your pan, it's either because the fish wasn't patted dry or the fillets were frozen and not fully thawed. Always ensure the fish is thawed completely and dry to the touch.
Bland or Tasteless Results
Flounder is a very mild fish. If it tastes bland, you likely undersalted the fillets before adding the butter. Salt the fish directly, then add the sauce on top.
| Problem | Root Cause | Solution |
|---|---|---|
| Fish falls apart | Overcooked or poor quality | Pull from oven earlier; check fillet integrity |
| Garlic tastes burnt | Too high heat/minced too small | Ensure garlic is well mixed into the butter |
| Sauce is separated | Butter cooled too quickly | Stir sauce immediately before pouring |
Common Mistakes Checklist
- ✓ Pat chicken wait, I mean fish completely dry before seasoning (prevents steaming)
- ✓ Use a single layer in the pan to ensure even heat
- ✓ Use a meat thermometer for absolute precision (target 63°C)
- ✓ Rest the fish for 2 minutes to let juices redistribute
- ✓ Don't skip the lemon zest; the juice provides the acid, but the zest provides the aroma
Adjusting the Portion Size
If you're cooking for a crowd or just for yourself, you can easily scale this.
Cooking for one or two (½ batch): Use a smaller baking dish (like a loaf pan or small rectangular dish) so the butter doesn't spread too thin and burn. Reduce the bake time by about 20% start checking at 10 minutes.
Cooking for a party (2x-4x batch): Do not crowd the pan. Work in batches or use two separate dishes. Increase the salt and pepper slightly, but only scale the garlic and lemon to 1.5x the original ratio to avoid overpowering the delicate fish.
For larger quantities, you might need to extend the bake time by 2–3 minutes, but check the center fillets frequently.
Busting Fish Myths
There's a lot of bad advice out there about cooking white fish. Let's clear a few things up.
Searing the fish first "locks in the juices." This is a total myth. Searing adds flavor and color, but it doesn't create a waterproof seal. In this recipe, the butter does a better job of protecting the moisture while keeping the process simple.
You must use expensive, wild caught flounder for it to taste good. While wild caught is great, high-quality farmed flounder is often more consistent in thickness and works perfectly for a quick weeknight meal.
Storage and Zero Waste Tips
If you happen to have leftovers, store them in an airtight container in the fridge for up to 2 days. To reheat, avoid the microwave if possible, as it will make the fish rubbery. Instead, place the fillet in a pan over low heat with a tiny bit of extra butter for 3–5 minutes.
For freezing, I don't recommend freezing the cooked fish, as the texture degrades significantly. However, you can freeze raw fillets individually wrapped in parchment and plastic wrap for up to 3 months.
To avoid waste, don't throw away your lemon halves. Squeeze every last drop for the sauce, then toss the peels into a freezer bag. Once you have enough, you can simmer them with water and sugar for a simple syrup or add them to a pot of boiling water for cleaning your kitchen sinks.
Ideal Pairings for This Dish
Since this is a light, zesty meal, you want sides that complement the brightness without stealing the show. A steamed pile of asparagus or sautéed spinach works brilliantly. If you want something more filling, a wild rice pilaf or a quinoa salad with cucumbers and feta balances the buttery sauce.
For a heartier dinner, pair this with a chicken mushroom casserole for those who want a mix of proteins on the table. The creaminess of the casserole contrasts the acidity of the lemon fish.
If you're serving this as part of a larger spread, a simple green salad with a light vinaigrette keeps the meal fresh and cohesive. Just remember to keep the sides simple so the delicate flavor of the flounder remains the star of the show.
Recipe FAQs
Why did my baked flounder turn out dry or rubbery?
Overcooking is the most likely cause. Use a meat thermometer to target 63°C and let the fish rest for 2 minutes to redistribute the juices.
How do I prevent the breadcrumb topping from burning before the fish is fully cooked?
Skip the breadcrumbs entirely. This recipe uses a butter lemon glaze instead of a crust, so there is no topping to burn.
Can I use a different type of fish, such as cod or tilapia, instead of flounder?
Yes, cod or tilapia work well. These white fish have similar textures, though thicker fillets may require a few extra minutes in the oven.
I need this recipe to be gluten-free and/or dairy-free. What substitutions work best?
Substitute the melted butter with olive oil for a dairy-free option. The recipe is already gluten-free. If you enjoy the simplicity of herb based flavors, this swap maintains the same freshness.
What is the best way to store leftovers, and can I reheat the baked flounder?
Keep them in an airtight container in the fridge for up to 2 days. Reheat in a pan over low heat with a bit of butter for 3 5 minutes to avoid the rubbery texture caused by microwaves.
How do I know for sure when the flounder is perfectly cooked?
Check for an opaque, pearlescent white color. The flesh should flake easily with a fork or reach an internal temperature of 63°C.
Is it true I must sear the fish first to get the best flavor?
No, this is a common misconception. Baking at 400°F ensures a tender result and concentrates the lemon garlic flavors without the extra step of pan-searing.
Lemon Herb Baked Flounder

