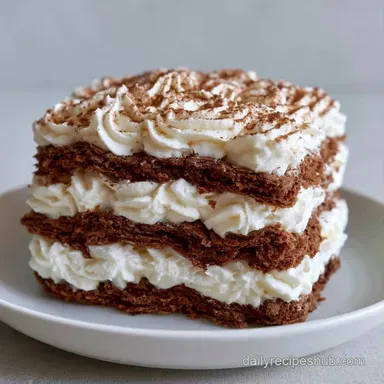
No-Bake Classic Chocolate Icebox Cake
- Time:15 minutes active + 6 hours 15 mins chilling
- Flavor/Texture Hook: Rich cocoa with a smooth, melt in-your mouth feel
- Perfect for: Summer potlucks or a low stress dessert for beginners
- Classic Chocolate Icebox Cake Made Simple
- Why You'll Love This
- The Essential Building Blocks
- Tools You'll Need
- Bringing It All Together
- Fixing Common Issues
- Troubleshooting Common Issues
- Ways to Mix It Up
- Scaling and Sizing
- Common Misconceptions
- Storage and Freshness Tips
- Pairing Ideas
- Recipe FAQs
- 📝 Recipe Card
Classic Chocolate Icebox Cake Made Simple
That first scent of strong coffee hitting a chocolate wafer is what gets me every time. I remember trying to make a fancy layered cake for a family reunion years ago, and I spent three hours fighting with a temperamental oven and a crumbly sponge. I was exhausted and stressed. The next year, I brought this instead.
I just layered cookies and cream in a glass dish and let the fridge do the heavy lifting.
Most people think you need a professional kitchen or a high end oven to get a "cake" texture. Forget that. You don't need to bake a single thing to get something that feels decadent. This Classic Chocolate Icebox Cake proves that time and cold temperatures are just as effective as heat and flour.
You can expect a dessert that is rich, cool, and surprisingly light. It doesn't feel heavy like a fudge cake. Instead, it has a clean, creamy finish that cleanses the palate. It's the kind of dish where the minimal effort pays off in massive flavor.
Why You'll Love This
- No Oven Required: You avoid the stress of temperature swings or sunken centers.
- Texture Contrast: The wafers start crunchy but end up with a tender, cake like bite.
- Customizable Sweetness: You control the sugar in the cream, making it less cloying than store-bought options.
Wafer Hydration: The cookies soak up liquid from the cream and coffee. This process softens the starch in the wafers, creating a sponge like consistency.
Cream Stability: Cold fats in the heavy cream hold air bubbles. These bubbles provide the lift and structure needed to keep the layers from collapsing.
| Method | Time | Texture | Best For |
|---|---|---|---|
| Fresh Whipped | 15 mins | Light and airy | Quality and taste |
| Canned Foam | 2 mins | Greasy and stiff | Absolute emergencies |
| Stabilized Cream | 20 mins | Dense and firm | Warm weather parties |
The Essential Building Blocks
The magic here is the interaction between the fat in the cream and the sugar in the cookies. If you use a low-fat cream, the cake will weep water and the wafers won't hydrate properly. Stick to full fat heavy whipping cream for the best results.
For the dip, strong coffee is a must. It doesn't make the cake taste like a latte, but it cuts through the sugar and makes the chocolate taste deeper. If you're avoiding caffeine, a strong decoction of chicory or even a bit of milk works.
What Each Ingredient Does
| Ingredient | What It Does | Best Swap |
|---|---|---|
| Heavy Cream | Provides structure and richness | Full fat coconut cream (adds coconut flavor) |
| Chocolate Wafers | Acts as the "flour" or base | Chocolate graham crackers (more honey notes) |
| Strong Coffee | Softens cookies and boosts cocoa | Milk or cold brew (milder flavor) |
| Powdered Sugar | Stabilizes the cream and sweetens | Icing sugar (identical result) |
The Full List
- 2 cups heavy whipping cream Why this? High fat content ensures stiff peaks.
- 1/2 cup powdered sugar Why this? Dissolves instantly without grit.
- 1 tsp vanilla extract Why this? Rounds out the bitterness of cocoa.
- 1 pinch salt Why this? Balances the sugar.
- 18 oz chocolate wafers Why this? Classic crunch that softens well.
- 1/4 cup strong brewed coffee Why this? Adds depth to the chocolate.
- 2 tbsp cocoa powder Why this? Provides a bitter, dark finish.
- 1/2 cup chocolate shavings Why this? Adds visual texture.
Tools You'll Need
You don't need a fancy arsenal here. A simple hand mixer or a stand mixer like a KitchenAid works great. The most important tool is a 9x9 inch square glass baking dish. Glass is better than plastic because you can see the layers, and it stays colder in the fridge.
I also suggest using an offset spatula. It helps you push the cream into the corners of the dish. If you don't have one, the back of a large spoon does the job just fine.
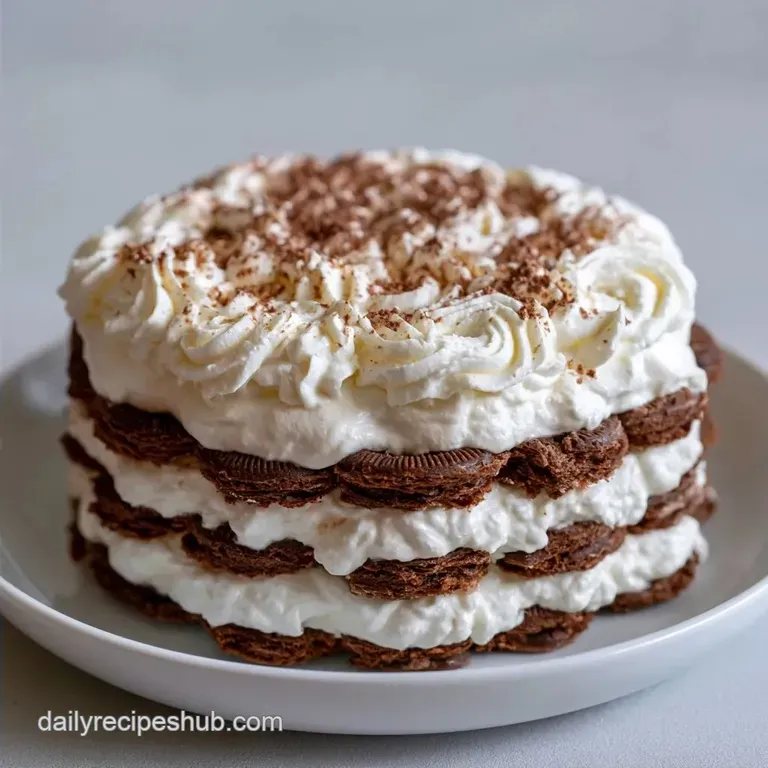
Bringing It All Together
Right then, let's get into the assembly. The trick is speed. You don't want to soak the wafers for too long, or they'll turn into mush before they even hit the pan.
Phase 1: Whipping for Volume
- Place your bowl and beaters in the freezer for 10 mins before starting.
- Beat the ice cold heavy cream, powdered sugar, vanilla, and salt in the chilled bowl.
- Start on low speed to avoid splashes, then increase to medium high.
- Whip until stiff peaks form, meaning the cream stands straight up when you lift the beaters. Note: Don't overbeat or it will turn into butter.
Phase 2: The Strategic Layering
- Spread approximately 2 tablespoons of whipped cream on the bottom of the 9x9 inch dish. This anchors the first layer.
- Quickly dip each chocolate wafer in the cooled strong brewed coffee. Dip for 1-2 seconds max.
- Arrange the dipped wafers side by-side to cover the base.
- Top the wafer layer with a generous amount of whipped cream.
- Smooth it to the edges using your spatula.
- Repeat these layers of dipped wafers and whipped cream until all ingredients are used.
- Finish with a thick, smooth layer of cream on top.
Phase 3: The Deep Chill
- Cover the dish tightly with plastic wrap.
- Refrigerate for 6 to 12 hours. This is when the "cake" actually happens.
- Before serving, dust the top with cocoa powder using a fine mesh sieve.
- Garnish with chocolate shavings.
Chef's Note: If you find the cream is too soft, you can add a tablespoon of instant pudding mix to the whipping process. This is a common trick mentioned on Serious Eats to keep whipped cream from deflating over several days.
Fixing Common Issues

It's rare for this to fail, but sometimes the textures aren't quite right. Usually, it comes down to the temperature of the cream or the dip time of the cookies.
Troubleshooting Common Issues
| Issue | Solution |
|---|---|
| Why Your Cake Is Runny | If the layers feel like soup, the cream probably wasn't whipped to stiff peaks, or it melted during the layering process. This happens if your kitchen is too hot. |
| Why Cookies Stay Crunchy | This usually means the cake didn't chill long enough. The wafers need hours to draw moisture from the cream. If you try to eat it after only two hours, you'll still feel the "snap" of the cookie. |
| Why the Cream Split | Over whipping is the main culprit here. If you see the cream starting to look grainy or yellow, you've gone too far. |
Ways to Mix It Up
Once you have the base down, you can play with the flavors. If you want something a bit more decadent, try a Homemade Ice Cream Cake for a frozen twist on the layering concept.
For a Mocha Chocolate Icebox Cake, add a teaspoon of instant espresso powder directly into the whipped cream. This intensifies the coffee notes and gives the cream a slightly tan hue.
If you want to add brightness, layer in thin slices of fresh strawberries or raspberries between the wafers and the cream. The acidity of the berries cuts through the richness of the chocolate. For those avoiding dairy, full fat coconut cream works well, though it adds a distinct tropical flavor.
You can also swap the wafers for chocolate graham crackers if you prefer a more honey forward taste.
Scaling and Sizing
Adjusting the size of this cake is pretty straightforward since there's no baking involved.
Scaling Down (1/2 Batch): Use a 4x4 inch square container or a small loaf pan. You'll use 1 cup of cream and about 9 oz of wafers. The chilling time remains the same, as the moisture migration takes the same amount of time regardless of size.
Scaling Up (2x Batch): Switch to a 9x13 inch baking dish. Double the cream and wafers, but only increase the salt and vanilla by 1.5x to avoid overpowering the chocolate. Be careful not to make the layers too thick, or the center might stay crunchy.
| Change | Adjustment | Result |
|---|---|---|
| Smaller Pan | Half ingredients | Individual servings |
| Larger Pan | Double ingredients | Party size |
| More Coffee | Increase dip time | Softer, more "cakey" texture |
Common Misconceptions
Some people think you need a specialized "icebox cookie." That's not true. Any sturdy, store-bought chocolate wafer or cookie that can withstand a quick dip in liquid will work. The cream provides the moisture, so the cookie just needs to be porous enough to soak it up.
Another myth is that this needs to be kept in the freezer. While you can freeze it, the fridge is actually better. Freezing the cream changes the texture from "cakey" to "icy," and you lose that smooth, luscious feel of the whipped cream. Keep it in the fridge for that classic texture.
Storage and Freshness Tips
This cake stays fresh in the fridge for about 3 to 4 days. Keep it tightly covered with plastic wrap or an airtight lid to prevent it from picking up other food smells from the fridge.
If you have leftover chocolate wafers, don't toss them. You can crush them up and mix them into a cheesecake crust or use them as a topping for a Summer Cream Cheese Cake.
For freezing, you can store slices of the cake for up to two months. Wrap each slice individually in parchment paper and then foil. To reheat, let them thaw in the fridge overnight. Don't use a microwave, or you'll melt the cream and end up with a chocolate puddle.
Pairing Ideas
Because this is so rich, you want things that offer a contrast in temperature or flavor. A hot cup of black coffee is the classic choice, as the heat melts the cream slightly as you eat.
For a beverage, a cold glass of almond milk or a tart raspberry tea works well. If you're serving this as part of a larger spread, pair it with a bowl of fresh macerated berries. The tartness of the fruit balances the heavy cocoa and cream.
For a plating touch, serve a square slice on a white plate and dust a little extra cocoa powder around the edges. A single fresh mint leaf on top adds a pop of color and a refreshing scent that complements the chocolate perfectly.
Recipe FAQs
How do you make the original icebox cake?
Layer dipped chocolate wafers and whipped cream. Dip wafers in coffee, alternate them with cream in a 9x9 dish, and refrigerate for 6 to 12 hours.
Why are my chocolate wafers still crunchy?
The cake didn't chill long enough. The wafers need several hours to draw moisture from the cream to lose their snap.
Why is my icebox cake runny instead of firm?
The cream likely wasn't whipped to stiff peaks. This prevents the layers from setting, especially if the kitchen is too hot during assembly.
Is it true that I can serve this cake immediately after assembling?
No, this is a common misconception. The cake must refrigerate for 6 to 12 hours to allow the wafers to hydrate and set.
How do I prevent the whipped cream from splitting?
Avoid over whipping the cream. Stop beating the mixture as soon as stiff peaks form to maintain a smooth texture.
What is the best way to store leftovers?
Refrigerate for 3 to 4 days. Keep the cake tightly covered with plastic wrap or an airtight lid to prevent it from absorbing food smells.
Can I serve this as a no-bake summer dessert?
Yes, it is an ideal no-bake option. If you enjoyed the chilled layering technique here, see how the same principle works in our easy ice cream cake.
Classic Chocolate Icebox Cake